WOODWORKING · DIY · A HANDMADE HOME @grainbyjoy
GRAIN by JoyWOODWORKING PLANS · WORKSHOP STORIES · HOME
FIND YOUR NEXT GOOD THING
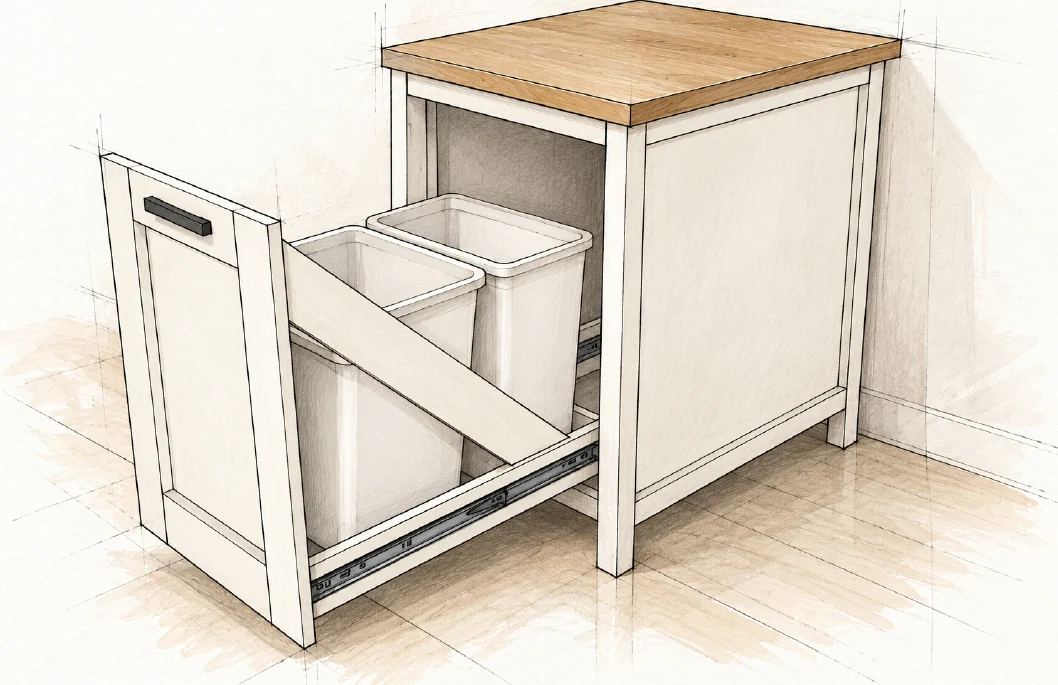
WOODWORKING PLANPullout Bin Kitchen Island
WOODWORKING PLANFarmhouse Media Console
WOODWORKING PLANRound Coffee Table
WOODWORKING PLANGeometric Hairpin Coffee Table
WOODWORKING PLANHollow Panel Waterfall Console
WOODWORKING PLANFarmhouse Console Table
WOODWORKING PLANBarn Door Console
WOODWORKING PLANBeginner Farm Table
WOODWORKING PLANFarmhouse Coffee Table
FREE WOODWORKING PLAN
Storage / INTERMEDIATE

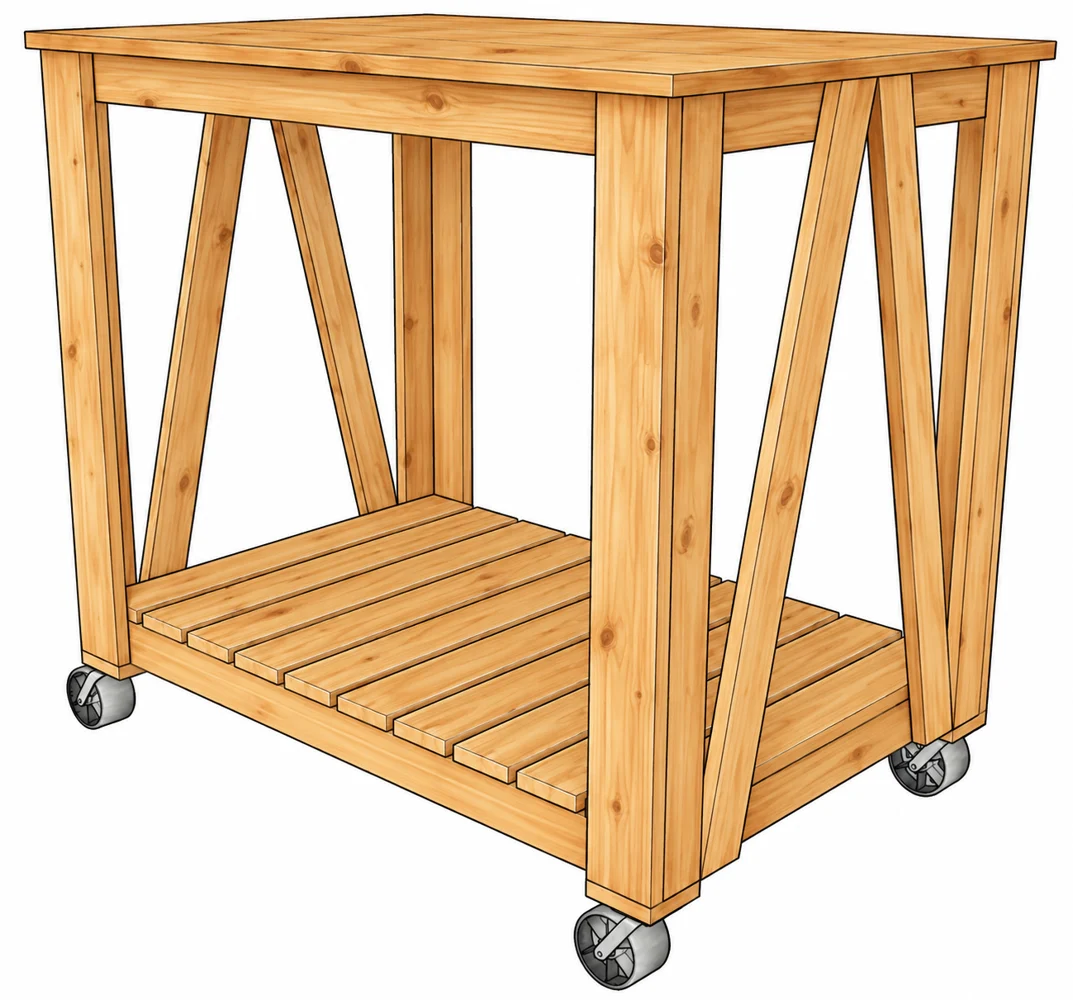
Farmhouse Kitchen Island

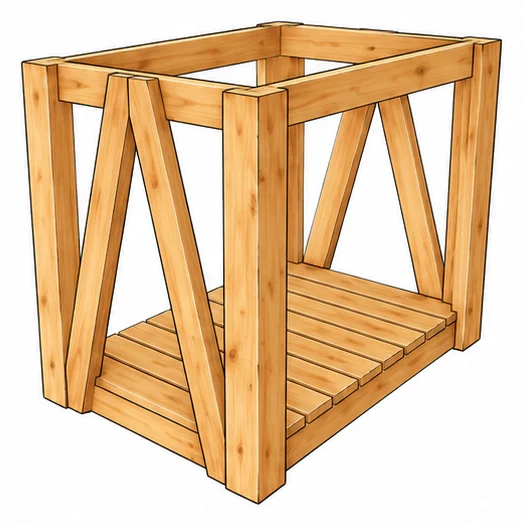
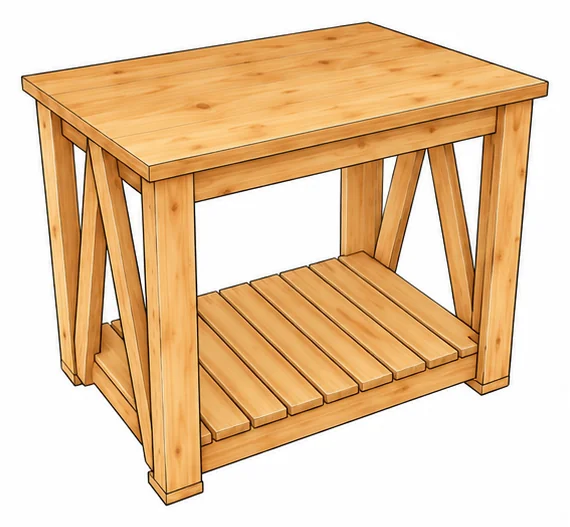
A rolling kitchen cart with an open lower shelf and inverted-V details.

FINISHED DIMENSIONSTop 41 1/2 x 28 1/2 in
SKILL LEVELIntermediate
WHAT IS INCLUDEDMaterials, cut list and illustrated steps
Read the free planMade this plan? Share your build
A GOOD BUILD STARTS WITH A CLEAR PLAN
  • Materials and tools
  • Cutting information and dimensions
  • Illustrated assembly steps
FROM THE FIRST CUT TO THE LAST DETAIL

Take it one step at a time

Everything you need to follow this build is written below. Read the materials, measurements and construction notes before your first cut.

Read the build steps

Yes. The complete plan is available to read on this page.
THE FREE BUILD GUIDE

Farmhouse Kitchen Island

A rolling kitchen cart with an open lower shelf and inverted-V details.

PREPARE

Materials and tools

QuantityMaterialNotes
41x4 x 8 ftPine or whitewood
11x4 x 6 ftPine or whitewood
51x3 x 8 ftPine or whitewood
1 each1x3 x 6 ft; 1x3 x 4 ftPine or whitewood
1Laminated pine panelTop thickness unverified
4CastersModel and mounting screws unverified
Not stated1 1/4 in brad nails; glue31.8 mm nail length

Tools and preparation

The original tutorial lists a miter saw, drill and nailer. The guide uses a pencil to mark fitted diagonal cuts. Practical additions: tape measure, square and clamps. Use appropriate eye and hearing protection and follow tool instructions.

Nominal stock and actual sizes

Common dressed 1x4 is 3/4 x 3 1/2 in (19.1 x 88.9 mm); 1x3 is 3/4 x 2 1/2 in (19.1 x 63.5 mm). Measure your boards rather than treating the nominal labels as actual sizes.

This guide uses the laminated-panel top. The source offers two 1x8 x 8 ft boards as an alternative, but its detailed board layout and support dimensions are not supplied.

CUT AND LABEL

Cut list

PartQtyStockCut inCut mmUse
A41x432 3/4831.9Wide leg boards
B41x332 3/4831.9Narrow leg boards
C41x339990.6Long frame rails
D41x324 1/2622.3Short frame rails
E101x426660.4Lower shelf slats
F41x333 11/16855.7Diagonals; mark to fit
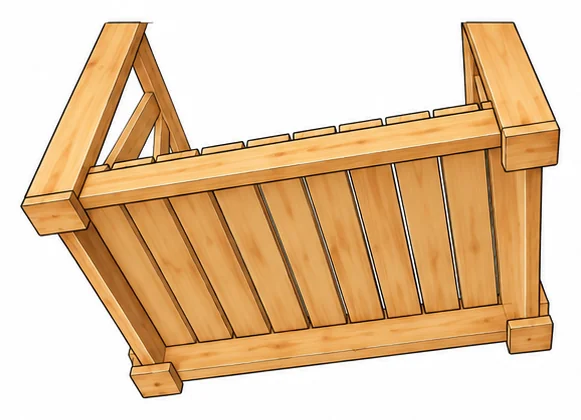
G41x43 1/482.6Caster foot pads
H1Laminated panel41 1/2 × 28 1/21054.1 × 723.9Top; thickness unverified

Read the cut list before fitting

A and B make four L-shaped legs. C and D make two equal rectangular frames. Use ten E slats even where perspective hides some boards in an illustration. The source spacing is 7/16 in (11.1 mm).

Fit diagonal angles in place

The cut map lists F at 33 11/16 in, but the original instructions say to hold each board against the frame and mark the ends. No numerical miter angle is supplied. Do not invent one from the illustration.

G pads have source-labeled faces of 3 1/2 x 3 1/4 in (88.9 x 82.6 mm). Part letters are assigned for this guide. Stock counts and cut quantities come from the source, not a new cutting optimization.

STEP 01 / ASSEMBLY

Build the leg and rail frames

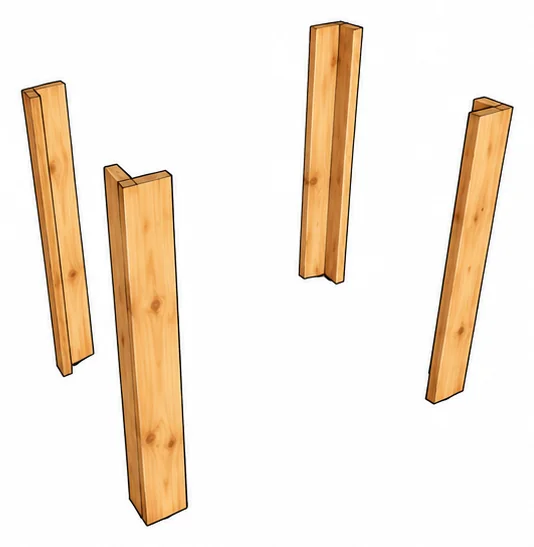
01 Make four L-shaped legs

Prepare four 1x4 leg boards and four 1x3 leg boards, each 32 3/4 in long. Pair one wide board with one narrow board to make each corner leg. Arrange them at a right angle in the L-shaped cross-section shown, with their top and bottom ends aligned. Join the 1x4 board to the 1x3 board using wood glue and 1 1/4 in brad nails. Repeat the same arrangement until you have four identical leg assemblies. These are the four upright corners; do not join the legs to one another yet.

Build the leg and rail frames · Farmhouse Kitchen Island

Beginner check Practical tip: dry-fit one pair first and compare the remaining legs with it so their L-shaped profiles and end alignment match.

Parts: A + B

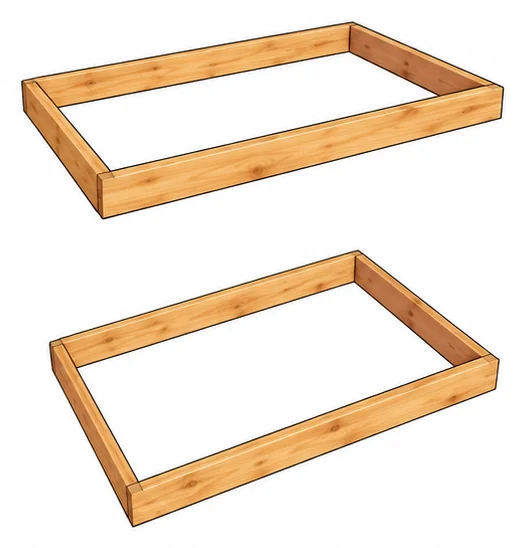
02 Build the two rail frames

Use the four 39 in 1x3 rails and four 24 1/2 in 1x3 rails to make two matching rectangular frames. Each frame uses two long rails and two short rails, arranged as in the original drawing. Attach the longer boards to the shorter boards with wood glue and 1 1/4 in brad nails. Make both frames identical in size and arrangement. Leave the center of each rectangle open: these are supporting frames, not solid shelves. One frame will connect the legs at the bottom, and the other will connect them at the top.

Build the leg and rail frames · Farmhouse Kitchen Island

Beginner check Practical tip: compare the frame diagonals before fastening; matching measurements help you spot a rectangle that has slipped out of square.

Parts: C + D

STEP 02 / ASSEMBLY

Assemble the cart

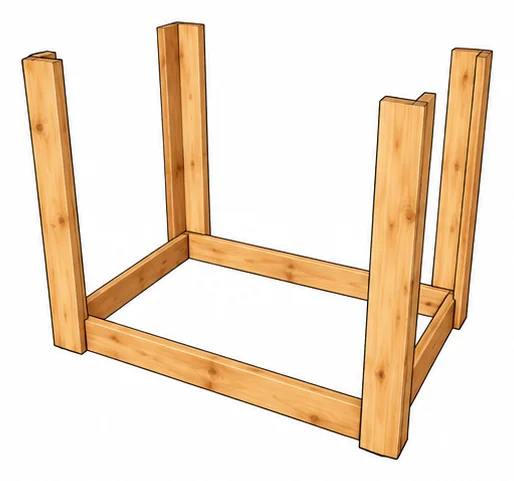
03 Connect the legs to the lower frame

Bring together all four completed L-shaped legs and one rectangular frame. Place one leg at each corner in the arrangement shown, with the frame seated inside the corner legs. Align this first frame flush with the lower ends of the legs; do not raise it to create an extra shelf clearance. Apply wood glue at the connections, then drive nails from the inside of the frame boards into each leg. The source does not state a nail length for this step. Leave the upper ends of the four legs unconnected for now.

Assemble the cart · Farmhouse Kitchen Island

Beginner check Practical tip: support the assembly on a flat surface and check every lower corner for flush alignment before fastening the last connection.

Parts: A + B + C + D

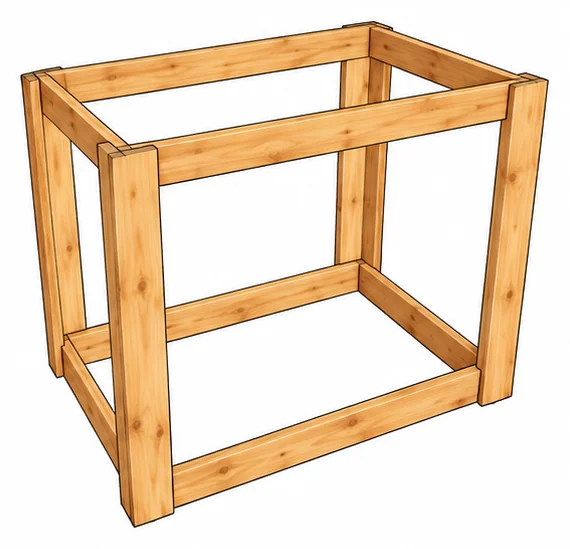
04 Add the upper frame

Fit the remaining rectangular frame between the upper ends of the four legs, matching the arrangement of the lower frame. The top frame must sit flush with the ends of the legs, as the first frame did at the bottom. Attach it with wood glue and 1 1/4 in brad nails driven through the frame boards into each leg. Once all four corners are connected, the assembly has four upright legs and two open rectangular rail frames. Do not add the tabletop yet; the lower shelf and decorative end pieces come first.

Assemble the cart · Farmhouse Kitchen Island

Beginner check Practical tip: check the upper frame against each leg end before nailing; a consistent flush edge gives the later tabletop an even support surface.

Parts: A + B + C + D

STEP 03 / ASSEMBLY

Add the shelf and diagonal braces

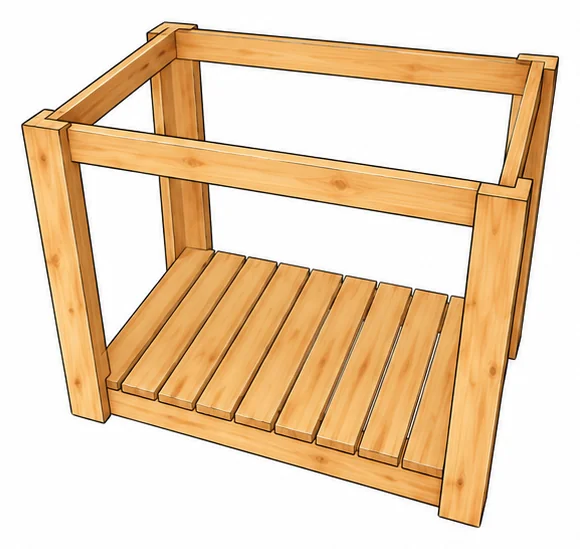
05 Install the lower-shelf slats

Use the ten 1x4 shelf boards cut to 26 in in the source cut map. Lay the boards across the short depth of the cart, side by side along its width, on top of the lower frame. Follow the source spacing of 7/16 inch between adjacent boards. Attach each board to the top of the shelf frame with wood glue and 1 1/4 in brad nails. Keep the upper rectangular frame open. This stage creates the slatted bottom shelf; the diagonal end decorations and the solid top panel are installed afterward.

Add the shelf and diagonal braces · Farmhouse Kitchen Island

Beginner check Practical tip: lay out all ten slats before fastening. Use a consistent 7/16-inch spacer and recheck the full arrangement before applying glue.

Parts: E

06 Fit the decorative end diagonals

Add the four decorative 1x3 diagonals shown on the two short ends of the cart. On each end, the two boards rise from opposite lower corners and meet near the center of the top frame, forming an inverted V rather than a crossing X. The cut map shows 33 11/16 in, but the source directs you to hold each piece in place and mark the required end cuts with a pencil. Set the miter saw to match those marks. Fit the pieces, then attach them with wood glue and 1 1/4 in brad nails.

Add the shelf and diagonal braces · Farmhouse Kitchen Island

Beginner check Practical tip: label each fitted diagonal by its end and position. Small differences in the assembled frame can make a fitted piece location-specific.

Parts: F

STEP 04 / FINISH

Finish the cart

07 Attach the four caster foot pads

Cut the four foot pads from 1x4 stock at 3 1/4 in long, as shown in the cut map. The underside drawing labels each pad face as 3 1/2 by 3 1/4 in. Position one pad over the bottom of each L-shaped leg, following the underside view, and attach it with wood glue and nails. The source does not specify nail length here. These pads provide a surface for attaching the four casters. The source lists casters but does not give their mounting-fastener specification or a separate wheel-installation procedure.

Finish the cart · Farmhouse Kitchen Island

Beginner check Practical tip: check your actual caster mounting plate against a pad before installation; use the caster manufacturer’s hardware requirements rather than guessing screw sizes.

Parts: G

08 Fit and secure the tabletop

Place the laminated pine project panel, cut to 41 1/2 by 28 1/2 in, on the upper frame as shown. Attach it with wood glue and nails driven through the top into that frame; nail length is not specified for this step. The source also allows a top made from 1x8 boards and suggests additional support boards inside the upper frame for that version. However, it does not provide their sizes or detailed joining layout in this guide. The panel option avoids relying on those missing alternative-top details.

Finish the cart · Farmhouse Kitchen Island

Beginner check Practical tip: dry-position the top and check its placement on all sides before fastening. Mark the frame position so nails enter the supporting rails.

Parts: H

CHECK BEFORE YOU BUILD

Final checks and sources

Confirm top and caster specifications

Overall height, top thickness, caster load rating, wheel size and mounting screws are unverified. The 32 3/4 in leg length is not the assembled height. No load capacity is claimed.

Check unspecified fastening details

Nail counts are not stated. Source steps 3, 7 and 8 say nails without specifying a size. The alternative board-top support sizes and layout are missing; the final step refers to a next page absent from the supplied original guide.

Source and attribution

DIY Modern Farmhouse Kitchen Island Cart by Shanty 2 Chic. Technical source checked October 29, 2026. Assembly wording is summarized in English; original stage order and views are retained.

Original how to https://www.shanty-2-chic.com/diy-modern-farmhouse-kitchen-island-cart/

Inches are primary. Millimeters are converted at 25.4 mm per inch and rounded to 0.1 mm. Nominal lumber labels are not measured dimensions. Illustrations are AI-restyled source views, not independent structural or manufacturing verification.

MAKE IT YOURS

Measure your own stock and dry-fit before fastening. If you make this project, I would love to see what you built.

Share your build